Nachfolgend eine umfassende Anleitung zur Installation des Open-Source Server Control Panels ISPConfig in Version 3.1. Die Installation umfasst den Apache2 als Webserver, Bind als DNS, Dovecot als Mailserver, sowie PHP-FPM mit XCache, HHVM, PureFTP, fail2ban, UFW Firewall und Lets Encrypt …
Vorbereitung
Die Installation von Debian Jessie erfolgte als Minimal.
Server = server1
Domain = domain.de
FQDN = server1.domain.de
IP-Adresse = 192.168.0.10
Konfiguration des Hostnamen über nano #/etc/hosts
127.0.0.1 localhost
192.168.0.10 server1.domain.de server1
# reboot
Prüfung des Hostnamen und des FQDN:
# hostname -> server1
# hostname -f -> server1.domein.de
Debian Paketquellen anpassen
# cat /etc/apt/sources.list
deb http://ftp.de.debian.org/debian jessie main non-free
deb-src http://ftp.de.debian.org/debian jessie main non-free
deb http://security.debian.org/ jessie/updates main contrib non-free
deb-src http://security.debian.org/ jessie/updates main contrib non-free
# aptitude update && aptitude safe-upgrade
Default Shell zu Dash ändern
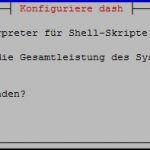
# dpkg-reconfigure dash
Dort dann No / Nein auswählen um zu /bin/bash zu wechseln:
Installation SSH Server
Falls noch nicht geschehen dann:
# aptitude install ssh openssh-server
Installation von NTP
Damit die Systemzeit immer aktuell ist wird sie mittels NTP mit einem Zeitserver synchronisiert:
# aptitude install ntp ntpdate
Installation von
- Apache2
- Bind
- Postfix
- Dovecot
- MariaDB / MySQL
- PureFTP
- ClamAV
- phpMyAdmin
- rkhunter
# aptitude install postfix postfix-mysql postfix-doc mariadb-client mariadb-server openssl getmail4 rkhunter binutils dovecot-imapd dovecot-pop3d dovecot-mysql dovecot-sieve dovecot-lmtpd sudo
Setup Postfix und MariaDB
- Typ = Internet Site
- Mail Name = server1.domain.de
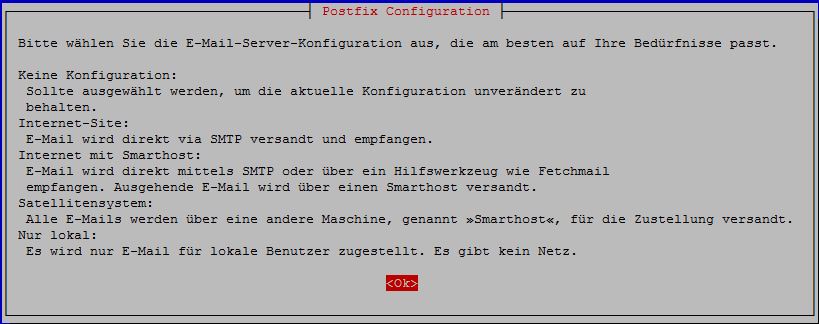
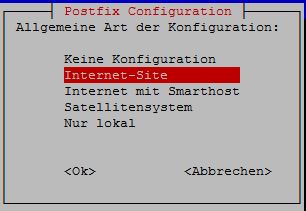

- MariaDB Passwort = Dein eigenes
- sollte statt MariaDB MySQL benötigt werden, einfach die Pakete „mariadb-client mariadb-server“ gegen „mysql-client mysql-server“ austauschen
TLS und SSL Support in Postfix aktivieren
Nachfolgend die Optionen aktivieren, Optionen ggf. zur Datei hinzufügen:
# nano /etc/postfix/master.cf
submission inet n – – – – smtpd
-o syslog_name=postfix/submission
-o smtpd_tls_security_level=encrypt
-o smtpd_sasl_auth_enable=yes
-o smtpd_client_restrictions=permit_sasl_authenticated,reject #muss ggf. hinzugefügt werden
smtps inet n – – – – smtpd
-o syslog_name=postfix/smtps
-o smtpd_tls_wrappermode=yes
-o smtpd_sasl_auth_enable=yes
-o smtpd_client_restrictions=permit_sasl_authenticated,reject
# service postfix restart
MariaDB für alle Interfaces aktivieren > nur localhost deaktivieren
# nano /etc/mysql/my.cnf
# Instead of skip-networking the default is now to listen only on
# localhost which is more compatible and is not less secure.
#bind-address = 127.0.0.1
# service mysql restart
Kontrolle: # netstat -tap |grep mysql
tcp6 0 0 [::]:mysql [::]:* LISTEN 2343/mysqld
Installation von Amavisd-new, SpamAssassin und ClamAV, div. Arichiver
# aptitude install amavisd-new spamassassin clamav clamav-daemon zoo unzip bzip2 arj nomarch lzop cabextract apt-listchanges libnet-ldap-perl libauthen-sasl-perl clamav-docs daemon libio-string-perl libio-socket-ssl-perl libnet-ident-perl zip libnet-dns-perl
ClamAV Konfiguration und ganz unten vor der Leerzeile hinzufügen von: # nano /etc/clamav/clamd.conf
AllowSupplementaryGroups true
Da ISPConfig 3 die Bibliothek von SpamAssassin über amavisd läd, kann SpamAssassin selbst gestoppt werden, was Ressourcen frei macht.
# service spamassassin stop
# systemctl disable spamassassin
Installation von Metronome XMPP Server
Seit Version 3.1 von ISPConfig ist es auch möglich das Protokoll XMPP (Extensible Messaging and Presence Protocol) und den Chat Server Metronome zu installieren. Dies jedoch optional:
# echo "deb http://packages.prosody.im/debian jessie main" > /etc/apt/sources.list.d/metronome.list# wget http://prosody.im/files/prosody-debian-packages.key -O - | sudo apt-key add -
# aptitude update
# aptitude install git lua5.1 liblua5.1-0-dev lua-filesystem libidn11-dev libssl-dev lua-zlib lua-expat lua-event lua-bitop lua-socket lua-sec luarocks luarocks
# luarocks install lpc
Shell Benutzer für Metronome hinzufügen:
# adduser –no-create-home –disabled-login –gecos ‚Metronome‘ metronome
Metronome herunterladen und installieren:
# cd /opt; git clone https://github.com/maranda/metronome.git metronome
# cd ./metronome; ./configure –ostype=debian –prefix=/usr
# make
# make install
Installation von Apache2 PHP5, phpMyAdmin, FCGI, MemCache, MCrypt
# aptitude install apache2 apache2.2-common apache2-doc apache2-mpm-prefork apache2-utils libexpat1 ssl-cert libapache2-mod-php5 php5 php5-common php5-gd php5-mysql php5-imap phpmyadmin php5-cli php5-cgi libapache2-mod-fcgid apache2-suexec php-pear php-auth php5-mcrypt mcrypt php5-imagick imagemagick libruby libapache2-mod-python php5-curl php5-intl php5-memcache php5-memcached php5-pspell php5-recode php5-sqlite php5-tidy php5-xmlrpc php5-xsl memcached libapache2-mod-passenger
- Webserver = Apache2
Apache2 Module suexec, rewrite, ssl, actions und include (für WebDAV auch dav, dav_fs und auth_digest) aktivieren
# a2enmod suexec rewrite ssl actions include dav_fs dav auth_digest cgi headers
Apache2 vor HTTPoxy Vulnerability schützen
# sudo nano /etc/apache2/conf-available/httpoxy.conf
<IfModule mod_headers.c>
RequestHeader unset Proxy early
</IfModule>
eintragen und das Modul aktivieren:
# a2enconf httpoxy
# service apache2 restart
Installation von HHVM (HipHop Virtual Machine)
Nur notwendig wenn die Unterstützung für HHVM benötigt wird.
# sudo apt-key adv –recv-keys –keyserver hkp://keyserver.ubuntu.com:80 0x5a16e7281be7a449
# echo deb http://dl.hhvm.com/debian jessie main | sudo tee /etc/apt/sources.list.d/hhvm.list
# sudo aptitude update
# sudo aptitude install hhvm
Installation von Let’s Encrypt Zertifikate
In ISPConfig 3.1 ermöglicht es die kostenlosen Zertifikate von Let’s encrypt zu verwenden und einfach zu verwalten. Die Installation läuft wie folgt und kann auch später vorgenommen werden.
- Jessie Backports hinzufügen: # echo „deb http://ftp.debian.org/debian jessie-backports main“ >/etc/apt/sources.list.d/backports.list
- # aptitude update && aptitude safe-upgrade
- Certbot installieren: # aptitude install python-certbot-apache -t jessie-backports
Memcached prüfen
# netstat -tap | grep memcached
tcp 0 0 server -:11211 *:* LISTEN 590/memcached
# echo stats | nc 127.0.0.1 11211
….
Installation PHP-FPM und XCache
Ich setze hier auf PHP FPM und XCache zu Optimierung des PHP-Codes bzw. zum Cachen der Seiten. Ebenso kann auch eAccelerator oder APC verwendet werden. PHP-FPM ist relativ jung und wird zunehmend bedeuttungsvoller, da die Geschwindigkeit der Verarbeitung im Vergleich zu den Urgesteinen bis zu 7x schneller ist. FPM kann nicht mit mod_fcgid verwendet werden, aber wie nachfolgend mit mod_fastcgi:
# aptitude install libapache2-mod-fastcgi php5-fpm
Nun noch die Module laden und den Apache2 neustarten:
# a2enmod actions fastcgi alias
# service apache2 restart
Installation XCache
# aptitude install php5-xcache
# service apache2 restart
Prüfen # php -v
PHP 5.6.24-0+deb8u1 (cli) (built: Jul 26 2016 08:17:07)
Copyright (c) 1997-2016 The PHP Group
Zend Engine v2.6.0, Copyright (c) 1998-2016 Zend Technologies
with XCache v3.2.0, Copyright (c) 2005-2014, by mOo
with Zend OPcache v7.0.6-dev, Copyright (c) 1999-2016, by Zend Technologies
with XCache Optimizer v3.2.0, Copyright (c) 2005-2014, by mOo
with XCache Cacher v3.2.0, Copyright (c) 2005-2014, by mOo
with XCache Coverager v3.2.0, Copyright (c) 2005-2014, by mOo
Installation von PureFTP und Quota
Als nächstes wird der FTP Server PureFTP mit Quota Unterstützung installiert:
# aptitude install pure-ftpd-common pure-ftpd-mysql quota quotatool
Nun noch die Konfiguration als Standalone anpassen:
# nano /etc/default/pure-ftpd-common
STANDALONE_OR_INETD=standalone
VIRTUALCHROOT=true
PureFTP mit TLS Sicherheit
FTP ist von Haus aus unsicher, der Datenverkehr wird unverschlüsselt übertragen. Daher setze ich auf TLS Sessions und somit auf FTPS:
# echo 1 > /etc/pure-ftpd/conf/TLS
Dafür benötigen wir ein Zertifikat das wie folgt erstellt wird:
# mkdir -p /etc/ssl/private/
# openssl req -x509 -nodes -days 7300 -newkey rsa:2048 -keyout /etc/ssl/private/pure-ftpd.pem -out /etc/ssl/private/pure-ftpd.pem
Country Name (2 letter code) [AU]:DE
State or Province Name (full name) [Some-State]:Germany
Locality Name (eg, city) []:Deine Stadt
Organization Name (eg, company) [Internet Widgits Pty Ltd]:Firma
Organizational Unit Name (eg, section) []:Abteilung
Common Name (e.g. server FQDN or YOUR name) []:server1.domain.de
Email Address []:kontakt@domain.de
Berechtigung des SSL Zertifikat setzen und PureFTP neustarten:
# chmod 600 /etc/ssl/private/pure-ftpd.pem
# service pure-ftpd-mysql restart
PureFTP Quota Kontrolle
Hierfür: # nano /etc/fstab anpassen und folgendes der Partition für „/“ hinzufügen: „,usrjquota=quota.user,grpjquota=quota.group,jqfmt=vfsv0“ Hier meine:
# /etc/fstab: static file system information.
#
# Use ‚blkid‘ to print the universally unique identifier for a
# device; this may be used with UUID= as a more robust way to name devices
# that works even if disks are added and removed. See fstab(5).
#
# <file system> <mount point> <type> <options> <dump> <pass>
/dev/mapper/pitvsrv04–vg-root / ext4 errors=remount-ro,usrjquota=quota.user,grpjquota=quota.group,jqfmt=vfsv0 0 1
# /boot was on /dev/vda1 during installation
UUID=6154a582-f40f-4511-a486-a036019b8f03 /boot ext3 defaults 0 2
/dev/mapper/pitvsrv04–vg-swap_1 none swap sw 0 0
/dev/sr0 /media/cdrom0 udf,iso9660 user,noauto 0 0
Quota aktivieren:
# mount -o remount /
# quotacheck -avugm
# quotaon -avug
Installation BIND DNS Server
# aptitude install bind9 dnsutils
Wenn es sich bei dem SErver um einen virtuellen handelt, dann sollte unbedingt haveged für eine bessere DNSSEC Signierung installiert werden. Für alle anderen kann es nicht schaden.
# aptitude install haveged
Installation von Vlogger, Webalizer und AWStats
# aptitude install vlogger webalizer awstats geoip-database libclass-dbi-mysql-perl
Nachfolgend noch die Cron-Jobs für die Erstellung der Statistiken kontrollieren, die auskommentiert sein sollen und so aussehen sollte:
# cat /etc/cron.d/awstats
#MAILTO=root
#*/10 * * * * www-data [ -x /usr/share/awstats/tools/update.sh ] && /usr/share/awstats/tools/update.sh
# Generate static reports:
#10 03 * * * www-data [ -x /usr/share/awstats/tools/buildstatic.sh ] && /usr/share/awstats/tools/buildstatic.sh
HIntergrund ist, dass ISPConfig awstats selbst verwaltet und steuert.
Installation von Jailkit
Wer SSH User nutzen möchte und diese nur auf berechtigte Verzeichnisse zugreifen lassen will kann diese ins Chroot paken. Dies ist nicht nachträglich installierbar:
# aptitude install build-essential autoconf automake libtool flex bison debhelper binutils
# cd /tmp
# wget http://olivier.sessink.nl/jailkit/jailkit-2.19.tar.gz
# tar xvfz jailkit-2.19.tar.gz
# cd jailkit-2.19
# ./debian/rules binary
Jailkit installieren:
# cd ..
# dpkg -i jailkit_2.19-1_*.deb
# rm -rf jailkit-2.19*
Installation fail2ban
Das Tool ist optional und muss nicht installiert werden. Einzig die Logs in ISPConfig werden dann nicht gezeigt.
# aptitude install fail2ban
Fail2Ban zum monitoren von PureFTP und Davecot einrichten und folgende Datei erstellen:
# nano /etc/fail2ban/jail.local
[pureftpd]
enabled = true
port = ftp
filter = pureftpd
logpath = /var/log/syslog
maxretry = 3
[dovecot-pop3imap]
enabled = true
filter = dovecot-pop3imap
action = iptables-multiport[name=dovecot-pop3imap, port=“pop3,pop3s,imap,imaps“, protocol=tcp]
logpath = /var/log/mail.log
maxretry = 5
[postfix-sasl]
enabled = true
port = smtp
filter = postfix-sasl
logpath = /var/log/mail.log
maxretry = 3
Nun noch die folgenden 2 Filter erstellen:
# nano /etc/fail2ban/filter.d/pureftpd.conf
[Definition]
failregex = .*pure-ftpd: \(.*@<HOST>\) \[WARNING\] Authentication failed for user.*
ignoreregex =
# nano /etc/fail2ban/filter.d/dovecot-pop3imap.conf
[Definition]
failregex = (?: pop3-login|imap-login): .*(?:Authentication failure|Aborted login \(auth failed|Aborted login \(tried to use disabled|Disconnected \(auth failed|Aborted login \(\d+ authentication attempts).*rip=(?P<host>\S*),.*
ignoreregex =
Nun noch ein ignoreregex in postfix-sasl hinzufügen:
# echo „ignoreregex =“ >> /etc/fail2ban/filter.d/postfix-sasl.conf
# service fail2ban restart
Installation von UFW-Firewall
Auch UFW ist optional und kann durch eine andere Firwall ersetzt werden:
# apt-get install ufw
Installation von RoundCube
Um möglichst die aktuelle Version des beliebten OpenSource Webmailer zu erhalten, wird RoundCube aus den Backports installiert:
# echo „deb http://ftp.debian.org/debian jessie-backports main“ >> /etc/apt/sources.list
# aptitude update
# aptitude install roundcube roundcube-core roundcube-mysql roundcube-plugins
- Roundcube für dbconfig.common = Ja
Nun noch Roundcube nur für Localhost berechtigen:
# nano /etc/roundcube/config.inc.php
$config[‚default_host‘] = ‚localhost‘;
$config[’smtp_server‘] = ‚localhost‘;
Nun einen Alias für den Webmail im Apache hinzufügen. /mail als Alias darf nicht verwendet werden, da ansonsten das E-Mail Modul von ISPConfig nicht mehr funtkioniert.
# nano /etc/apache2/conf-enabled/roundcube.conf
Alias /webmail /var/lib/roundcube
Apacahe neustarten: # service apache2 reload
Der Webmailer ist nun unter folgenden Adressen erreichbar:
- http:// 192.168.0.10/webmail
- http://server1.domain.de/webmail
- http://www.domain.de:8080/webmail (nach Installation von ISPConfig)
Installation von ISPConfig 3.x
Installiert wird die aktuelle Version (stable)
# cd /tmp
# wget http://www.ispconfig.org/downloads/ISPConfig-3-stable.tar.gz
# tar xfz ISPConfig-3-stable.tar.gz
# cd ispconfig3_install/install/
# cd install# php -q install.php
Der Installer wird nun alle Dienste konfigurieren, wobei Debian Jessie noch als „unknown version“ erkannt wird.
——————————————————————————–
_____ ___________ _____ __ _ ____
|_ _/ ___| ___ \ / __ \ / _(_) /__ \
| | \ `–.| |_/ / | / \/ ___ _ __ | |_ _ __ _ _/ /
| | `–. \ __/ | | / _ \| ‚_ \| _| |/ _` | |_ |
_| |_/\__/ / | | \__/\ (_) | | | | | | | (_| | ___\ \
\___/\____/\_| \____/\___/|_| |_|_| |_|\__, | \____/
__/ |
|___/
——————————————————————————–
>> Initial configuration
Operating System: Debian 8.0 (Jessie) or compatible
Following will be a few questions for primary configuration so be careful.
Default values are in [brackets] and can be accepted with <ENTER>.
Tap in „quit“ (without the quotes) to stop the installer.
Select language (en,de) [en]: de
Installation mode (standard,expert) [standard]:ENTER
Full qualified hostname (FQDN) of the server, eg server1.domain.tld [server1.domain.de]:ENTER
MySQL server hostname [localhost]:ENTER
MySQL server port [3306]:ENTER
MySQL root username [root]:Passwort eingeben (siehe oben)
MySQL root password []: Passwort eingeben (siehe oben)
MySQL database to create [dbispconfig]:ENTER
MySQL charset [utf8]:ENTER
[INFO] service Postgrey not detected
Configuring Postfix
Generating a 4096 bit RSA private key
……………………………………………………………++
…………………++
writing new private key to ’smtpd.key‘
—–
You are about to be asked to enter information that will be incorporated
into your certificate request.
What you are about to enter is what is called a Distinguished Name or a DN.
There are quite a few fields but you can leave some blank
For some fields there will be a default value,
If you enter ‚.‘, the field will be left blank.
—–
Country Name (2 letter code) [AU]:DE
State or Province Name (full name) [Some-State]:Germany
Locality Name (eg, city) []:city
Organization Name (eg, company) [Internet Widgits Pty Ltd]:
Organizational Unit Name (eg, section) []:
Common Name (e.g. server FQDN or YOUR name) []:server1.domain.de
Email Address []:kontakt@domain.de
[INFO] service Mailman not detected
Configuring Dovecot
Configuring Spamassassin
Configuring Amavisd
Configuring Getmail
Configuring Jailkit
Configuring Pureftpd
Configuring BIND
Configuring Apache
Configuring vlogger
[INFO] service OpenVZ not detected
Configuring Ubuntu Firewall
[INFO] service Metronome XMPP Server not detected
Configuring Fail2ban
Configuring Apps vhost
Installing ISPConfig
ISPConfig Port [8080]:
Admin password [admin]: dein ISPConfig Passwort
Re-enter admin password []: nochmal dein ISPConfig Passwort
Do you want a secure (SSL) connection to the ISPConfig web interface (y,n) [y]: y
Generating RSA private key, 4096 bit long modulus
…………………………………………..++
…………………………..++
wie oben
Please enter the following ‚extra‘ attributes
to be sent with your certificate request
A challenge password []:ENTER
An optional company name []:ENTER
writing RSA key
Configuring DBServer
Installing ISPConfig crontab
Installing ISPConfig crontab
no crontab for root
no crontab for getmail
Detect IP addresses
Restarting services …
Installation completed.
Nun kann das Server Panel über:
- http://server1.domain.de:8080
- https://server1.domain.de:8080
mit deinem oben vergebenen Passwort aufgerufen werden.
neukonfigurieren von ISPConfig 3
Sollte man im obigen Schritt etwas vergessen haben, oder möchte später etwas neukonfigurieren, kann man das wie folgt nachholen:
- ggf. ISPConfig3 wie oben beschrieben neu herunterladen
# cd /tmp/ispconfig3-stable-3.1-b9a3ef486ebcde18a5ade37865ff8f397185d24f/
# /tmp/ispconfig3-stable-3.1-b9a3ef486ebcde18a5ade37865ff8f397185d24f# cd install/
# /tmp/ispconfig3-stable-3.1-b9a3ef486ebcde18a5ade37865ff8f397185d24f/install
# php update.php
Interessiert in verschiedenste IT Themen, schreibe ich in diesem Blog über Software, Hardware, Smart Home, Games und vieles mehr. Ich berichte z.B. über die Installation und Konfiguration von Software als auch von Problemen mit dieser. News sind ebenso spannend, sodass ich auch über Updates, Releases und Neuigkeiten aus der IT berichte. Letztendlich nutze ich Taste-of-IT als eigene Dokumentation und Anlaufstelle bei wiederkehrenden Themen. Ich hoffe ich kann dich ebenso informieren und bei Problemen eine schnelle Lösung anbieten. Wer meinen Aufwand unterstützen möchte, kann gerne eine Tasse oder Pod Kaffe per PayPal spenden – vielen Dank.
